Here is a reel that showcases my projects from the Intermediate Motion Graphics class I took in the Spring of 2018.
Included is my Character Animation, Logo Animation, and TV Show Package.
Here is a reel that showcases my projects from the Intermediate Motion Graphics class I took in the Spring of 2018.
Included is my Character Animation, Logo Animation, and TV Show Package.
For my last project in Intermediate Motion Graphics 😦 I created several elements to be used for a fictional TV Show. The package included a Title Opener, Bumper, Lower Thirds, and a Transition with a looping background.
I looked at many TV show title openings and various graphics to get inspiration. Crime dramas and mysteries are my absolute FAVE, so I looked at those types of shows and the types of graphics they use. Some shows that I looked at include:
– 60 Minutes
– 20/20
– Dateline
– 48 Hours
– Crime Watch
– The First 48
I wasn’t completely thrilled with the inspiration I was getting so I looked at other shows that are similar but had more content that I could pull from.
– Law & Order SVU
– Chicago P.D.
– Criminal Minds
– American Horror Story
– True Blood
– The Walking Dead
– True Detective
– Stranger Things
– Orange is the New Black
I created three style frames to layout what I wanted my elements to look like. While creating them, I thought about the different pieces and how they would move and animate so that when I got into After Effects, I had a clear vision of the end product.
One of my favorite parts about television openings and credits is the music that plays over them. It is imperative to have the right kind of music paired with the video in order to convey the message clearly. I scoured YouTube’s Free Audio Library looking (or listening) for the perfect audio track. I also needed to find other sound effects for the other elements such as the typewriter, the blood splatter, and the knife.
For this project, I created an animation for a logo I completed in my Corporate Design class. The logo was for a small start-up Farm & Brewery called Hop Scratch Farm & Brewery. Throughout this project, I learned new skills including various effects, working with 3D objects, cameras, and lighting.
To begin this process, I did a lot of research on different logo animations and styles of animation. I looked at everything from complex animated logos, to simple bugs in the corner of television screens.
As mentioned previously, I had created this logo for a previously taken class. I thought it would be interesting to build upon the logo using animation. Below are the original sketches of the logo’s development, and other deliverables showing how the logo is to be used.
To get an idea of what I wanted my animation to do, I sketched out different motions and animations that I might want to do. I thought about the different effect that I could try that would suit my animation nicely.
Before getting into After Effects and starting to actually animate, I created style frames to get an idea of what my animation would look like.

During this step in creating my character animation, I worked on putting everything together to create a full, cohesive animation. That included adding the scene, finessing the movement of the character, bringing in audio, and adding a title animation as well.
After taking a brief hiatus from this project while I was on Spring Break, I got back to it by inserting the living room scene into my animation. Right away I noticed how much more complete this made my animation feel. While the animation as a whole was far from being finished, I was able to get a better idea of how my elephant might move around by having that scene established.


From the beginning, I was dissatisfied with how the elephant walked. I had been studying how cartoons walk, specifically Winnie the Pooh, but just somehow wasn’t able to execute my vision. Throughout the process, I made subtle changes to his movements based on what I observed through research, in hopes this would make his walking look more realistic.
After making these changes, I still just couldn’t pinpoint what I needed to do to make his walking look like he wasn’t just floating across the screen while his arms and legs flapped in the air.
Finally, it came to me. I needed to give his whole body more motion than just sliding across the screen in a straight line. While his legs make the walking motion, I had his body move up and down, because, DUH! Our bodies have some up and down motion when we walk! This helped immensely in making the walking motion look more realistic and more fluid.

After may trial and error attempts, here is the final animation in all its glory.
As the second step in creating my character animation, I designed a scene in which my character would live and interact with. Starting with simple sketches and then moving to Adobe Illustrator, I was able to bring this environment to life and add it to my animation to give it more substance.
After creating my elephant character, I had an idea of the style and aesthetic I wanted the scene to have. Because of the flat, cartoonish design of the elephant, I felt it appropriate for the scene/background to follow suit. Below are a few images that helped me envision a room, a style, and different objects I could include in my scene.
I look my initial sketch and worked to apply these styles to it. Having these style inspirations helped me to be more consistent and stay on task with my original vision for the animation. In Illustrator, I designed an environment for my elephant to live in and that matched the style of him as well.
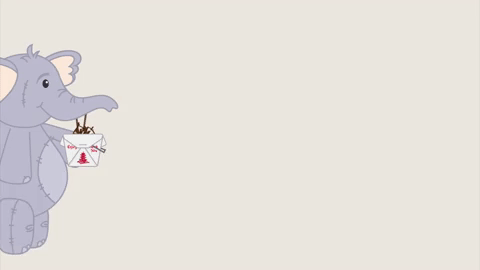
Overall, I designed two different scenes that are to be featured in my animation. The first scene is of the elephants living room and the second scene is outside on the street in front of his favorite Chinese restaurant, Sammy Chang’s Chinese Take-Out.
Our second project is one that I am equally excited and nervous about. We will be working in After Effects to animate a character that we create. The character can be anything from an illustration done in Illustrator, a drawing, collage, or whatever we want as long as it aligns with the project guidelines. I am excited because I love drawing and creating little cartoons, and I am excited to learn how to animate my drawings. However, at this point in time, I am not clear on how I will even animate my little character. But that’s what school is for. I’ll learn how to do it!
I started with thinking of a story that I wanted to animate. My idea was to show the process of a very excited elephant going to pick up his Chinese food. He gets to his car and buckles up his precious food and he looks lovingly at it. When he gets home, he joyfully skips into his house and then settles himself on the sofa with his yummy meal. As he unpacks his goodies, his eyes get big with anticipation and excitement! All of a sudden, his beloved Chinese take-out slips through his hands, ultimately falling onto the carpet below. He looks down in despair as he knows his lo mein is unsalvagable.
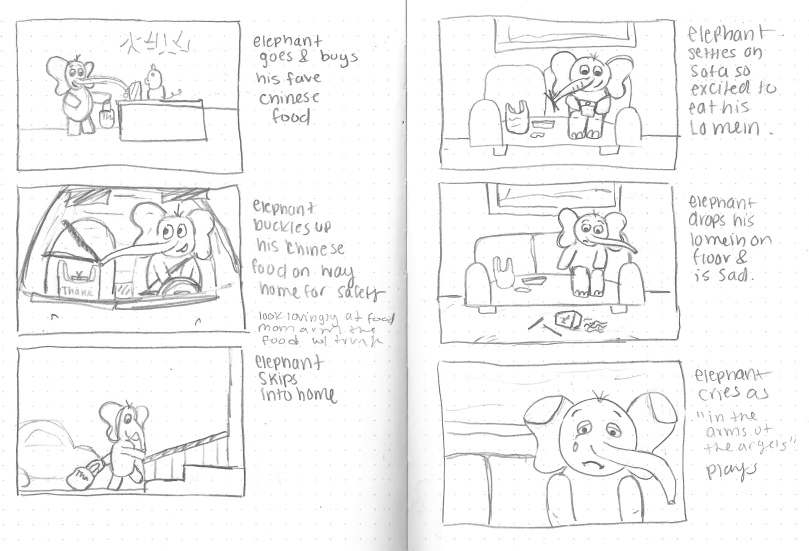
Before we started animating our characters, we thought about how we want them to move, their emotions, and personality.
– When the elephant is picking up his food, he feels: Excited, Giddy, Hungry
– When the Elephant gets in the car he: is caring, looks loving towards his Chinese food, is thankful that he has his food
– When the Elephant walks inside and sits down to eat he is: anticipatory, happy, in love, excited, satisfied
– Poor Elephant drops his Lo Mein and at first is: confused, shocked, sad
– The Elephant comes to terms he has lost his Lo Mein and feels: disappointed, depressed, lost, alone

The Elephant will have a super cute appearance, kind of doughy like Winnie the Pooh to make it relatable so the viewer will fall in love with the character. He will have a cute bounce to his step as he is a cute, chubby Elephant. When he sees his food, he will get big puppy dog eyes making the audience relate to how the Elephant reacts towards food. He might get hearts in his eyes because he just loves the Chinese food so much. He will have great facial expression changes to show his wide range of emotions throughout the piece. His movement will be bouncy, ploppy, and soft. He will come across as a soft and squishy stuffed animal Elephant that the audience will just want to hold.
I created my elephant in Adobe Illustrator. When I made him, I saw him almost as a mixture of Winnie the Pooh and Eeyore. I made him as a stuffed animal with stitches just to give him a cuddly and cute look.


As you can see, this is not at all what my storyboard looks like, but after getting into After Effects, I kind of realized that I had no clue how to animate what I wanted to. So, I am taking baby steps, relearning the basics as well as more advanced skills. Here is what I was able to do for this
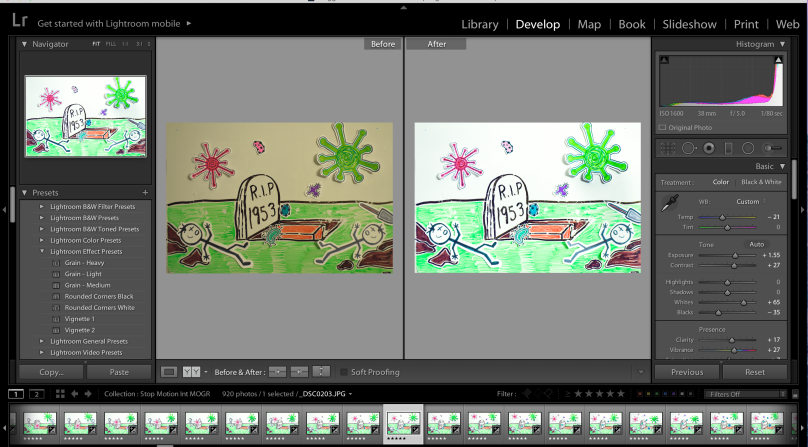
During week 4, we took our photos we shot during week 3 and edited them in Adobe Lightroom and then assembled them in Adobe Premiere Pro and After Effects to create our full stop motion. We searched for different sounds and music that would help us tell our story, but also that would not be distracting to the viewer.
We used Adobe Lightroom to edit out photos we took. The original photos came out very warm and yellowish due to the poor lighting in my bedroom.
We assembled our stop-motion primarily using Adobe Premiere Pro. To start, we brought in all of our photos to see what we had. In the beginning, we played around with different frame rates and speeds to see what worked the best. After getting a feel for how fast each frame needed to go, we wrote and recorded a script to accompany the photos. I just recorded myself reciting the script on my laptop and plopped the audio right in; attempting to edit out mistakes and weird noises:) We decided to use YouTube’s Audio Library to find our music and sound. Searching for the right music to accompany our video was a daunting task, but we ended up finding, what we felt, was just what we needed. After putting together the meat of the stop-motion (or the actual stop-motion itself), we took it into After Effects to add on the titles, and after a few thousand renders we had our final product!
While viewing our final version, of course, there are things we would like to change, but overall we were happy and satisfied with it.
We open on the title page seeing dirt fly up from the bottom of the screen as the word “Shots” appears repetitively. The song “Shots” by LMFAO (feat. Lil Jon) plays in the background.
The scene transitions to a graveyard with two men digging up a tomb labeled with the year 1953 (representing 10 years before the measles vaccine was created). This symbolizes that there is someone who died from the measles in the grave. Spooky music plays as we see deadly ancient germs erupt from the grave, killing the men. This scene is a representation that by not getting important vaccinations, we are essentially digging up these old diseseases that had been eliminated.
Next, we enter into the informative part of the video. We talk about how the measles had been eradicated in the year 2000 but made a staggering comeback in 2010 and then in 2014 with 667 cases reported across the United States. Information about the particular measles vaccination is shared.
In the next scene, the Top Three old diseases that are making a comeback appear as the cartoon to the right animates, contracting symptoms of the illnesses.
Finally, a cartoon boy, wrapped in a band-aid, waddles onto the screen with his pack of band-aids. A final PSA to get yourself and your kids vaccinated is shared. The band-aid around the boy symbolizes the vaccines as they are both protectors for your body. He waddles, once again, off the screen followed by the credits.
For our third week of class, we took our storyboards, style frames, and narratives and started to shoot our stop motion. Our goal was to shoot 1000 – 1400 photos in order to get a 1-minute video.
As mentioned Process #2 part of our blog, we were inspired by ASAP Science’s YouTube channel’s aesthetic using whiteboard drawings and paper. This was a really fun process as we got to color and play with our Crayola marker; something we just don’t have the time or opportunity to do much anymore. We created about 35 individual drawings on paper to use in our stop motion.

On the day we planned to shoot our stop motion, bad snow and ice got in the way of shooting where we had originally planned, which was at school, in a well-lit room, with a giant whiteboard. Instead, my partner and I worked with what we had in my bedroom to shoot our video. We used a super fancy setup of a small, decrepit whiteboard hanging for dear life from my wall by Command Hooks, fantastic lighting from a slightly broken bedroom lamp, and stale sticky tack and scotch tape as adhesives for our paper pieces. We luckily had a nice DSLR camera (minus a faulty battery that only held a charge for about 15 minutes at a time) and a nice tripod to use. We found a way to use what we had and decided not to make excuses and try to make the best stop motion we could.


What’s Next?
The next step in our process is to assemble and finalize our stop motion in preparation to share with the world. We need to edit the nearly 1000 photos taken and bring then into Adobe Premiere Pro and After Effects.
During our second week of class, we worked on developing our ideas for the stop-motion and thinking about how it might look. To start, my partner and I settled on a topic our video would be based upon. We worked to create a storyboard, outlining the story, actions, and transitions of our project. After that, we used our storyboard to create style frames, in order to decide on an overall approach to the stop-motion.
My partner and I decided to create our stop motion about vaccinations, or more specifically, the effects of not vaccinating our children. We took a symbolistic approach to get our message across so it wasn’t so “in your face.”
Two men/women are digging up an old grave with a headstone that reads 1963 (the year the measles vaccine was created). While they are digging, horrendous germs start to emerge from the grave, consuming everything. We then look at various statistics outlining the reemergence of these old diseases that had been maintained after the invention of their vaccines. Accompanied by silly illustrations, this somewhat very dark, sad, serious, and controversial subject matter will have a slightly lighter and humorous feel to it. Our goal is to convey the importance of vaccinating yourself and your kids, in order to prevent these deadly diseases coming back, but we don’t want to put a complete damper on people’s days.
** Please excuse my misnumbering of my storyboard sketches.
As part of the process, we created our own set of style frames based on our storyboard. By creating these frames, we were able to try out the style of stop-motion we wanted to execute, and share sample stills before completing the whole video. Throughout this process, we discovered different ways to create elements including mixing the dry erase style with markers and paper. We were inspired by the style of videos used by ASAPScience on YouTube. Their mixture of whiteboard drawings and doodles on paper felt like a fun and exciting challenge that would suit our project well. Drawing out these style frames helped us to collect our thoughts and refine anything that might not work out.
Our next step in the motion graphic process is to actually create our stop-motion. By using our style frames and storyboard, we will hopefully have a clear idea of how we wish to continue and be able to create a fun and informative video!
To start our first partnered project of a stop-motion representing a cultural myth, we first did some mind mapping of what we believe cultural myths are, as well as some visual research for inspiration. We then created four narratives (2 each) of a topic that came out of our mind-mapping exercise.

The story of old Saint Nick (Santa) bringing presents for the children on Christmas has been around for years. Scenes of his workshop creating teddy bears, toy trains, and dolls are planted into our minds by the countless books and movies created. And then the infamous vision of a beautifully decorated tree with mounds of presents underneath is what we all ultimately dream of. However, this is not the reality of most families in the middle and lower class of our country. Imagine being a young kid still believing in Santa and seeing that your well-off friend got an Xbox, an iPad, and four-wheeler, while you got a pair of socks, a book, and box of crayons. If Santa is real, and such a loving a great being, then why does he love the rich kids so much more?
Using pieces of cut out paper and another 2D object we will create a scene with Santa delivering a ton of presents to upper-class families and then to those of middle to lower-class families. Almost showing Santa in a bad light to get the point across of privilege during the holiday season.
Throughout history many creation myths have been created by religions, cultures, and groups of people to attempt to explain how the world started, the meaning of life, and what happens to us when we die. There are numerous myths involving supernatural beings creating the moon and sun and other aspects of life.
Using a white or chalkboard, we can create an illustration collage combining a variety of characters and scenes from various creation myths.
